Wednesday, February 29, 2012

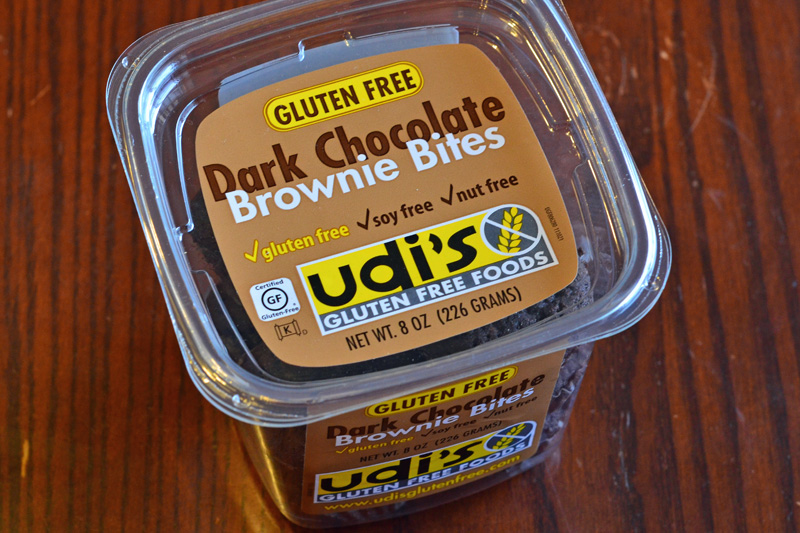
Udi's Gluten-Free Brownie Bites - The Bite Sized Spotlight

Udi's Gluten Free Foods has become a household name. Yet, this popular brand is a paradox in itself, for all it's bread, bagels, pizza crusts and muffins contain cornstarch or an ingredient derived from corn; however their cookies are miraculous corn-free.

We accidentally stumbled on Udi's Gluten-Free Brownie Bites.  As soon as we took that first bite- We were in heaven [choir sings] :3  Each Brownie Bite is perfection. The inside is extremely moist, the chocolate is rich and exquisite.... you'll be left wondering can this really be Gluten-Free?

The Good Stuff Rating: 5/5

Udi's Gluten-Free Brownie Bites are free of: Gluten, Soy, Nuts and Corn

Wednesday, February 8, 2012

Can I eat this? There's an app for that.


Are you tired of checking ingredients list for allergens? Even after reading them are you still left wondering," Can I really eat this?" Now there's an app for that; several in fact! Technology is catching up with the everyday needs for those with allergies, food intolerance, Celiac Disease, and special dietary needs. There are many problems faced when grocery shopping, and thanks to these bar code scanning apps life is so much simpler.

Here are the Top 2 free apps on currently on the market: Scan-Life and RedLaser.

Scan Life- [For: iPhone, Android, Windows Phone,and Ovi(nokia)]

Pros- Is the most popular of the allergen bar code scanners.This app loaded with lots of features. In addition to listing allergen contents;it also lists calories, and nutritional values, price comparisons and much more. It lists top 8+ allergies, including corn, and sulfates, and sesame seeds.The best part, is this app is all about personalization. Customize it to search for your allergens and nutritional needs, or even bargains.

Cons- Some users might find these type results a bit too simplistic.The app has a color coated system(Green-safe, Yellow- possible allergen, Red-allergen alert) indicating if your product is safe to eat. It doesn't list which ingredients are derived from which allergen.

The Good Stuff rating- 4.5/5


RedLaser
- [For: iPhones, Android and Windows Phone]

Pros- Is a well known bar code scanning app that is great for finding bargains. One of its many newest features; is it can be used to check the allergen and nutrition info. The app is fairly simple and straight forward. Just scan the bar code, it will list Nutrition Facts, Allergen Info and Item Prices. It provide a nice allergen summary. It also lists which ingredient came from what allergen; making it a useful learning tool.

Cons-The app doesn't have the customization features such as Scan Life. It only includes Top 8 allergies.One of my concerns with this app, is the warning at the end of the allergen summary. The allergen data comes from FoodEssentials.com if a company changes the formula of it's product and FoodEssentials.com isn't aware of it, then it raises a risk. In spite of this flaw, it's still a nice app.

The Good Stuff rating: 4/5

Saturday, January 28, 2012

~Ode to Cookies~ Gilbert Gourmet Cookie Dough

There one thing that we've missed most this holiday season is, baking sugar cookies. It's a time honored tradition that has brought families together for generations. Yes, you can you can create your own gluten-free cookie dough. The truth is, the majority of these recipes require the use of butter or soy/corn based shortenings. Those allergic to dairy/soy/corn are out of luck. We were on the verge of retiring our cookie cutters, until we discovered Gibert's Goodies Cookie Dough


Gilbert Gourmet Cookies are known for their outstanding reputation of gluten/allergy-free baked goods. The company, founded by Liz Gilbert, (who also has food allergies); has created a high quality allergy friendly product free of: gluten, nuts, soy, corn, dairy, trans-fats and contain all natural ingredients. Their cookies recently won the Outstanding Gluten-Free Award from the CT Fancy Food Association.

This cookie dough is a dream come true. The quality is impeccable, and it's tastes even better than regular cookie dough. It's easy to use and bake. The dough can be used immediately or stored in the freezer. It's very versatile, one can bake 60-80 small cookies, a delicious pie crust or whatever your imagination desires . The price for 1 tub (16oz) of cookie dough, sells for $5.99-$7.99! However, being able to experience the joy of baking sugar cookies again, you can't put a price on that ^^


The Good Stuff rating: 5/5


Gilbert's Gourmet Goodies

Monday, January 23, 2012

新年快乐年 - Happy New Year!

At midnight, January 23, 2012, Chinese people around the world will welcome the new year, ushering in the Year of the Dragon. The year of the dragon carries great optimism and promise for positive change. It's the most powerful of the 12 signs of the zodiac. This year is very special, because it is the year of the water dragon, something that happens once every 60 years.

The Chinese New Year is symbolized by a new animal zodiac, determined by a 12-year cycle; beginning with the Rat and continuing through the Ox, Tiger, Rabbit, Dragon, Snake, Horse, Goat, Monkey, Rooster, Dog and finally the Pig. The date varies from year to year, ranging from the end of January through the middle of February. ( This year Jan 23- Feb 6)

Chinese holiday traditions include forgiving past conflicts, hosting elaborate feasts, setting off fireworks and giving children money in red envelopes. The celebrations last 15 days, on the final day a lantern festival takes place in which red lanterns are hung outside houses.

There are many Chinese New Year dishes that are said to bring good fortune. There's none more special than, the Orange. Traditional they're served at the end of a meal; there said to bring good luck and wealth. This Chinese New Year were giving a special shout-out to our favorite fruit: The Orange ^^ Good Luck + Vitamin C= Good Stuff!


source: China Highlights

photo: Chinese New Year Cards

[TY to my adorable cousin for writing Happy New Year in Mandarin ^^]

Sunday, January 22, 2012

Anime Extra: Kawaii Onigiri Sticker ^.^


Extra! Extra! As part of our Anime & Cooking special; we were inspired to created this Kawaii Onigiri sticker ^^ . Get these delicious Rice Balls, while supplies last!


Stickers can be purchased through our Facebook page, or Yardsellr account.


Proceeds will go to fund The Pocky Campaign.


This sticker is designed by: ABARTONS
© 2011, SB. all right reserved.

Monday, January 9, 2012

"I ♥ Rice" Stickers' are now on Sale!


The wait is over! Our "I ♥ Rice" Stickers' are now available for sale. Do you love Rice? Then this home-made sticker is just for you^^


Stickers can be purchased through our Facebook page, or Yardsellr account.

Proceeds will go to fund The Pocky Campaign.

Get them while supplies last!


This sticker is designed by: ABARTONS
© 2011, SB. all right reserved.

Thursday, January 5, 2012

Pikachu Christmas Cake


Japanese Christmas Cake is a traditional holiday dessert made of sponge cake, strawberries and whipped cream. When we found this video of a Pikachu Christmas cake, we were inspired to bake a gluten-free version. We made two versions of the recipe one with eggs/dairy and a dairy-free version. This recipe take a lot of work, but the results are well worth it ^^

Ingredients:

The Cake:
1 bag of Namaste Vanilla Cake Mix (or use your favorite G-free mix)

Egg version

3 Egg Whites
2 Tsp of Cream of Tarter
1 cup of club soda
omit the water

Egg-Free/Banana Version
Egg-Free Recipe Ingredients:
2 large rip bananas
1/4 of a cup of water
1 cup of club soda

-----------------
Whipped Cream:

Fat-Free Whipped Cream:
1/2 cup of non-fat dry milk
1/2 cup of cold water
3/4 tsp of gelatin
1 tbsp of water
2 TBSP of honey
1/2 tsp of vanilla

Rockin' Vegan Coconut Whip Cream:
1 Can of coconut milk (full fat or two 1/3 fat cans)
2 TBSP of corn-free confections sugar
1/4 tsp of vanilla

--------------------

1/4 of a cup Enjoy Life chocolate chips
6-7 strawberries sliced
yellow food coloring or 2TBSP of turmeric and 1/3 cup of hot water

------------

Materials: parchment paper

-----------------

Directions:

Prep:

Slice 6-7 strawberries vertically. Take two strawberries and chop off the end- those will be Pikachu's checks. Place the strawberries in the fridge until needed.

[If you plan on using Coconut Whip-cream. Prep by putting can(s) in the fridge over night, and to prep while the cake is baking]
---------------

The Cake:

1) Line your cake pans with parchment paper, the bottom and the sides.

2) Pokemon Trainers the choice is yours: Follow the original Namaste recipe or use either of our substitutions. We going to be using 1/2 of the mix, if you wish to make a large cake then double the substitutions.

- EGG Version-

1) Place 3 Eggs White in a mixing a bowl , with 2 tsp of cream of tartar, and beat with a hand mixer until you reach soft peaks.

2) Slowly fold in 1/2 of the Namaste Foods Vanilla cake mix; then add club soda (make sure its room temperature), and keep folding.

3) When ingredients are mixed, pour the batter in the lined cake pans.

4) Place in the oven at 350 degrees, and bake for 20-25 mins. Cake is done when toothpick inserted inside in center comes out clean.
------------------------

-EGG-Free/Banana Version

1) Take 2 large rip banana's chop and place in a microwave safe bowl, then add 1/4 of a cup of water. Place bowl in microwave for 1 minute or until banana's are soft.

2) Place microwaved banana's in mixing bowl and blend using a Cuisine-Art or handmixer.

3) Then add 1/2 of the Namaste Foods Vanilla cake mix, and 1 cup of club soda( at room temperature) and mix well.

4) Pour the batter into the lined cake pans, and bake for 30 mins at 350 degrees. [Note banana cake is very sticky, but it doesn't mean its not cooked]

--------


3) When your cakes are done baking, remove form the oven and let them cool for about 15-20 mins. [Let the banana cake cool a little longer]

4) After the cakes have cooled down, remove them from there pans. This should be much easier due to the parchment paper. Place cake on a large plate.


banana cake pieces

5) [*Kids have your parents do this steps*] Using a sharp knife, cut the cake into even square pieces, like brownies. The banana is going to be similar to cutting a cheesecake-so use a very sharp knife and rise it in cold water each time before cutting a new piece.

egg white cake pieces

[Don't worry about the color of the cake, its perfectly normal for banana cake to be much darker]

Shaping-

Now it's time to start building Pikachu. Are you ready?

1) To create Pikachu's face, take 8 square cake pieces, place 4 on the bottom and 4 on the top, making a square. (just like in the photo above.)


2) Using a knife, cut off the edges to form a circle/oval shape.

3) To create the Ears. Take 8 square pieces, and form to rectangles; 2 piece on top and 2 pieces on the bottom. Using a knife chop off the edge creating a round long oval, like in the photo above. Do this for each ear. [We made our cake using both the banana cake pieces and egg-white cake pieces.]

The Creamy Center-

Here comes the fun part....whipped cream ^^ If you can't use regular whipped cream, feel free to use either the Fat-Free Dairy version or our Rockin' Vegan Coconut Whipped Cream, both of them are delicious ~.^

You'll need to make two batch of whipped cream, one for the inside of the cake, and other for the outside.

The Inside-

1) Remove the top pieces of the cake. Cover the bottom with whipped cream.

2) Then place the sliced strawberries on the whipped cream.

3) Place the other cake pieces back on top and cover the area with whip cream, using a knife you can start shaping Pikachu's face and ear. Place in fridge for 15 so cream can harden slightly.

The Outside-

This is where we start to see Pikachu take shape. Using the other batch of whipped cream that was set aside, add yellow food coloring. Add as much coloring needed until you get a nice soft yellow color.

To make your own yellow food coloring:

1) Take 2 TBSP of turmeric + 1/3 of a cup of water.
2) Boil the mixture until there is a strong yellow/orange color, and set aside and cool.

1) Remove cake from the fridge, the white layer of whipped cream on the top should be nice and semi-hard. Using the yellow whipped cream start frosting the top and the white parts are covered.


2) Now it's time to set the face ^^ Take the strawberry ends that we set aside earlier those are Pikachu's checks.

There are several way to create the eyes and mouth, and nose, we used chocolate.

To create Pikachu's eye, nose and mouth:

- 1) Take a medium rectangle piece of parchment paper
- 2) Melt 1/4 of enjoy Life Chocolate chips in the microwave, spread the chocolate on the parchment.
- 3) Place in fridge until semi-hard.
- 4) Using a knife trace two eye, a small circle for a nose, like the photo above.

3) Place the eye, nose and mouth on the cake. To make the white take a drop of whipped cream and place it on the circles.


4) The Ears: Take the left over melted chocolate and crumbly it, sprinkle until you form the ears.


Pikachu Christmas Cake.... Happy Holidays ^^